Tips for Reducing File Size

Do you have large document files that you are trying to send to colleagues or upload to an online site such as myLesley, VoiceThread, OneDrive, or SharePoint? In many cases, compressing your files, images, and videos will help to reduce your overall file size and meet size restrictions.

As a best practice, when uploading large files you will want to make sure that you are using a fast, stable Internet connection.

Documents (Microsoft Word)

You can reduce the file size of your document by compressing images. The compression options reduce both the file size and image dimensions based on how you intend to use the picture, such as viewing on screen or in an e-mail message. You can compress all images in the file or just the ones that you select.

For more information see:
Reduce Your File Size in Office for Mac
Reduce the File Size of a Picture in Microsoft Office (PC)

Presentations (Microsoft PowerPoint)

You can reduce the file size of your presentation by compressing images and media content. The compression options reduce both the file size and media dimensions based on how you intend to use the media.

For more information see:
Reduce Your File Size in Office for Mac
Reduce the File Size of a Picture in Microsoft Office (PC)
Compress Your Media Files

PDFs

You can reduce the file size in your PDF by compressing the entire PDF. This will reduce overall file size.

For more information see:
Optimizing PDFs in Acrobat Pro
Reduce the Size of Your PDF Online using Small PDF

Images

You can reduce the file size of your images by resizing. Please note that resizing an image will slightly reduce the image quality.

For more information see:
How to Resize a JPEG Using Paint in Windows
How to Resize a JPEG Using Preview in Mac OS X
How to Resize a JPEG Using an Image Resizing Website

Video

You can reduce the file size of your videos by saving in a different format, resizing, or compressing the file. Please note that this may slightly reduce the video quality.

For more information see:
How to Reduce Video Size Using Handbrake on PC
How to Reduce Video Size Using Handbrake on Mac
How to Reduce Video Size Using iMovie (Mac)

Updates to the myLesley Inline Grading Tool

New Box View, the inline grading tool for myLesley, has released two new updates: the ability for faculty and students to download the annotated PDFs and the ability for faculty to annotate Excel files (.xls, .xlsx).

To download an annotated PDF, located the graded assignment in the Grade Center (faculty) or the My Grades area (students).

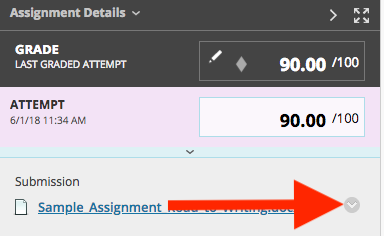
When viewing the graded assignment, go to the right-hand column and click on the chevron next to the submission file.

Screen Shot of submission download options

This will bring up two options. Select Download Original File to download a copy of the original submission (no markups) or select Download Annotated PDF to download a copy of the marked up paper.

Screen Shot of submission download options

Please note that you may need to open the PDF in a PDF reader, such as Acrobat Reader, in order to view the comments.

For more information on grading assignments in myLesley, see Grading myLesley Assignments.

Have questions? Want to set up a training? Email elis@lesley.edu.

Faculty Spotlight: Dr. Olivia Cheever

Dr. Olivia Cheever

Dr. Olivia Cheever teaches Anatomy and Kinesiology Through Somatic Learning in the Expressive Therapies program.

In 2012, Dr. Olivia Cheever decided to take the plunge and begin bringing some of her course materials online. Olivia teaches Anatomy and Kinesiology Through Somatic Empathy in a five-day intensive format. Realizing that she wanted more time in class for hands-on practice, she reached out to eLearning and Instructional Support for help in moving some of her content online.

Olivia started slowly, first posting her syllabus, creating a course introduction and some narrated presentations using VoiceThread, and introducing a class blog. Over time, she began adding additional elements to the course, including course materials (readings and videos), online discussions, an online journal, and assignments. When her typical 5-day intensive course was cut down to 4 days because of the July 4th holiday, she was able to bring more content and activities online to make up the missed class time. With the skills she has gained, she is now preparing to teach an independent study course with a student at a distance.

What was the driving force in wanting to bring some of your content online?

I teach Anatomy and Kinesiology through Somatic Empathy in a one-week intensive format. A lot of what we do in class is hands-on movement and touch. Part of why I wanted to explore moving content online is to give students pre-work, so they come to the course further along, already having experienced something experientially, as well as didactically.

So, giving them, for example, a recording of a movement lesson and having them practice the movement and writing in their journal. So, they first see what the movement will be like, then they practice the movement and sense what is going on with their skeletons and their muscles, then they reflect and write in their journals about what they felt in their body. This allows them to capture what they’re learning from the inside out and the outside in, which is what somatic learning is all about.

I find that giving my students this pre-work gives them a little bit of a taste before they come in class that we can build on during the week we’re together.

The other reason that I wanted to do it is that, as an adjunct, I wanted to take advantage of the tremendous resource that is free to us at Lesley University with the eLIS staff, who are so accommodating and welcoming.

What are some of the advantages for you and your students using this more blended format?

It provides the opportunity for students to be using different parts of their brain. With online learning, they can take a look at videos, read through articles, and enter a discussion board with each other. Then you don’t have to take up class time; you can cover the big points in class and they can follow up online in their own time.

I think that another advantage of online learning is that some students who are quiet in class are more articulate when they write online. It’s wonderful sometimes to have students come out and be more forthcoming through that medium, where they’re not as comfortable sharing in class.

It also helps to bring up some issues before we meet in class. For example, some students are not comfortable being touched. And part of what we do in class is based on touch. We explore anatomy with hands-on palpation of self and others. So knowing that in advance gives us some time to work through it and come up with some solutions.

Also, one of the ways that I address diversity in my class is showing films from other cultures and documentaries with other ethnicities and you can do that through this platform. It’s very nice that you can include video in the online course rather than trying to find a DVD and DVD player to show the video in class.

What kinds of challenges have you faced?

I find this very challenging because I’m used to teaching in front of a class. I go from being an old-fashioned professor where you’re doing a lot of written review, feedback, and written papers and doing a lot of in class discussion to stepping back and being more of the guide on the side. Which is something that I really enjoy but it’s an art.

For an example, you see an online discussion going and want to insert a comment like, “good for you, guys, that sounds great,” or, “what about this over here?” or something like that. I can’t do that yet. Not during that week we’re meeting. What I do instead, at the end of the course, is read their papers as well as the discussion boards and the ongoing journal and I try to bring them together with my overall feedback.

Do you have any advice for faculty who may be hesitant to include technology in their teaching?

There are those, I think, who would benefit from this but don’t know how to take the first step. But it’s important to take that first step. To reach out.

There are some faculty who may feel that they can’t do it because they’re not comfortable with the actual mechanical stuff, such as using the computer and navigating online. And that may be something where they would benefit from a one-on-one or a small group where they can go at their own speed and build up to it.

I’m able to do it now, but in some of the eLIS workshops and trainings things can move quickly. And that can be intimidating for those that don’t know what they’re doing. But knowing that they can set up a one-on-one to get started and move slowly, at their own pace, that’s helpful.

Do you want to learn more about adding online elements in your course? Do you have ideas for adding digital content into your course but don’t know where to begin? Email elis@lesley.edu to set up an appointment. We’re happy to meet in person, online, or on the phone.

Introducing Kaltura ASR Captions

Kaltura Media has the ability to automatically add captions to your video content using automatic speech recognition (ASR). When a video is uploaded, the ASR processes begins immediately. Captions are created based on the audio track and the content is assumed to be in English.

Why are captions important?
Accurate captioning of audio and video content ensures that people who are Deaf and hard of hearing can understand the content. Additionally, captions are very useful to non-native English speakers, viewers watching in a sound-sensitive environment such as a library, can help viewers with learning disabilities or attention deficits maintain concentration. and can help all learners improve comprehension.

The following video effectively explains the importance of captioning.


How are captions created?
All videos created after August 6, 2018 will be auto-captioned. This means that once you create your video or upload your video to Kaltura, ASR captions will be automatically ordered and applied to your video. The process may take several minutes to several hours, depending on the length of your video.

What about older videos?
You can request ASR captions for any videos created before August 6, 2018. Detailed instructions may be found here: Add Captions to Previously Uploaded Video Content.

How accurate are ASR captions?
ASR captions are only 80% accurate and accuracy may vary depending on the audio quality, clarity of speech, background noise, etc.

While 80% accuracy may seem pretty decent, please keep in mind that this means that, in general:

  • 1 in 5 words will be incorrect
  • An 8-word sentence will be about 17% accurate
  • A 10-word sentence will be about 11% accurate

How do I improve the accuracy of my captions?
While ASR captions are a step forward for accessibility, we recommend editing them for accuracy. You can edit your captions right in your web browser – no additional software is needed! For more information and detailed instructions, see Review and Edit Captions.


Provide Grading Feedback With Audio and Video

Blackboard now allows you to embed an audio/video recording of your feedback as you grade attempts. This feature is available for all graded content, including assignments, graded discussions, or in the Grade Details area of any Grade Center column.

Why Provide Audio or Video Feedback?

Providing feedback using audio or video allows you to connect with your students, especially those at a distance. You can give them a glimpse of your personality and show them the real person behind the text. Creating this connection can make it easier to interact, share information, and ensure that your students don’t feel isolated.

Text-based feedback can lend itself to misinterpretation – students may weight all of the feedback equally or be overwhelmed by a lot of text on the page. Audio allows you to add tone and emphasis, perhaps even humor and support, while video allows you to add facial expressions and gestures.

How Do I Add Audio or Video Feedback in my Course?

You can add audio or video feedback on any gradable item in your course. To do so, access the Feedback to Learner area. You may do this directly from an Assignment or from within the Full Grade Center.

From within an Assignment:

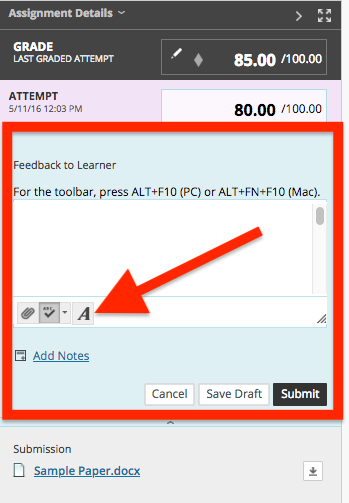
From your student’s submission, navigate to the Assignment Details area. In the Feedback to Learner area, In the Feedback to Learner area, click on the Full Content Editor button. This will open the full text/content editor.
Screenshot of Feedback to Learner area of Assignment

For more information on grading assignments or accessing the students’ submissions, see Grading Assignments in myLesley.

From a Grade Center column:

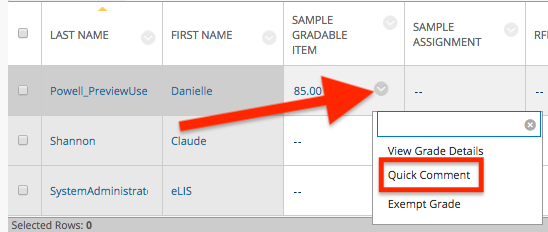
Navigate to the Full Grade Center and hover your mouse over the item you wish to offer feedback. Click the chevron to open a menu and select Quick Comment.

screenshot of accessing Recording Feedback from within the Full Grade Center

Launch the Recorder:

From the Full Text/Content editor, click the Record Feedback Button (first button on the third row of the text/content editor).screenshot of record feedback button

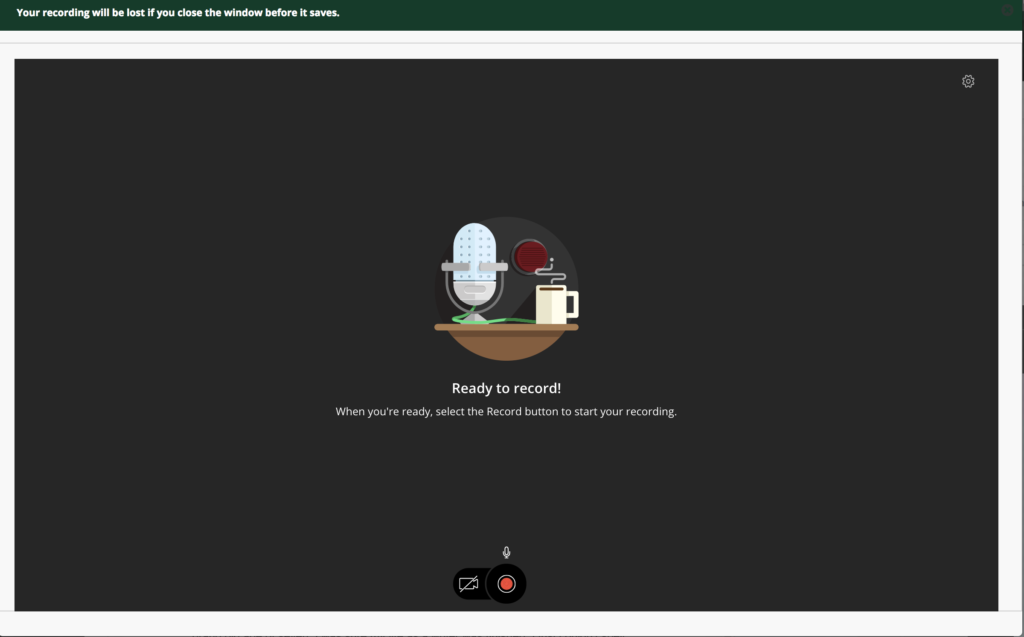
This will launch the recorder. Click the video button to launch your webcam or click the record button to record audio only. Each recording may be a maximum length of five (5) minutes.screenshot of record feedback

Once you have finished recording, your audio or video recording will be added to the student’s feedback area. Detailed instructions for using the Record Feedback option may be found here: Record Audio and Video.

What if I want to upload a video I recorded elsewhere or provide my students with a screencast?

If you recorded a video in a different tool, you may upload it using the Kaltura Mashup Tool. You may also upload a video to Kaltura directly from your mobile device.

If you would like to record a screencast, you may use Kaltura CaptureSpace Lite.

Where can I find more information on providing feedback to my students?

To find out more about providing feedback to your students, check out the resources below: