Fixing Broken Wiki Links

In this week’s Agent L episode, Gremlins in the System (GITS) try to undermine student collaboration by breaking links to wikis in myLesley courses. It’s Agent L to the rescue.

BenBen Friday: Agent L, it’s a disaster. GITS agent, NeoLuddite, has broken all the links to course wikis in myLesley. Look…

Error: Broken Course Link: Item does not exist in the system. The specified object was not found.

Agent L: What does he hope to accomplish?

Ben: NeoLuddite thinks technology is going to ruin education. By corrupting links to the wikis,  he hopes to stop students from collaborating online. We can’t let him win.

neoluddite_sq

Agent L: Letting NeoLuddite win is not an option. The wiki links can be fixed.

Ben: How?

Agent L: It’s easy, Ben. We simply delete the old link to the wiki and create a new one.

Ben: But won’t that delete the wiki?!?agent L

Agent L:
Not at all. The wiki is still there with all the students’ work. We just need to
recreate the link to allow them to find it again.

Ben: How do we do that?

Agent L: Simple. Let’s go into a course and I’ll show you.

First, let’s delete the bad link. Click on the small gray arrow at the end of the wiki title and select Delete from the menu.

course wiki link     deletelink

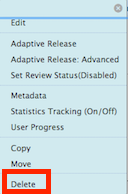
Remember, this is only deleting the link, not the wiki.

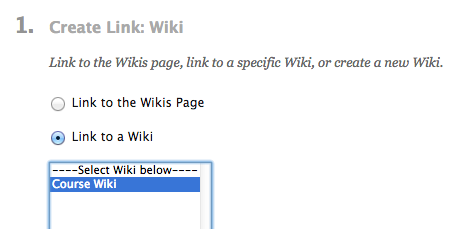
Now, we can recreate the link. go to the Tools menu and select Wikis.

Tools menu

Select Link to Wiki to choose to create a link to an existing wiki and select the name of the wiki from the list. Then click Next.

select wiki link

Add a description or instructions for you students and click Submit. That’s all there is to it.

Ben: It’s working. I can access the wiki and see everyone’s contributions. It’s all there.

Agent L: Of course. NeoLuddite can’t get the best of us. We have technology at our disposal.


agent LSee the complete instructions at the Agent Support Site.  

ARTstor Digital Library: A place of visual primary sources

ARTstor is a digital library full of images for you to use for classroom instruction, especially if you want to integrate visual literacy. Its title can be a bit deceiving but ARTstor’s true focus is less about discipline and more about giving educators online access to over 1.8 million authoritative visual primary sources. You and your students will discover content from a wide range of museums, archives, libraries, and other types of cultural heritage institutions that span various time periods, movements, and cultures.

Check out what collections are available, http://www.artstor.org/collections. Some of the collections used with students doing research include:

Not only does this educational technology have visual resource collections, it allows easy integration into your online classroom environments. Some great tech features include curating groups of images sharable in Blackboard, links to share on blogs, and generate of PowerPoint presentations. Any images collected using ARTstor’s image group feature automatically live in the system so you never have to worry about losing them or your image presentation. Please be advised that ARTstor registration is required to use the tool!

If you want to learn how to use ARTstor there are a number of resources that come in various formats ranging from videos, written instructions, and in-person help. Visit the websites below or find help in at the Moriarty Library 

ARTstor Help Resources
Moriarty Library’s ARTstor Help Guide
ARTstor’s YouTube
ARTstor’s Knowledge Base

Contact a Librarian for help!
Kate Thornhill, MLIS
Research and Instruction Librarian for Digital Scholarship
Moriarty Library
617-349-8070
kthornhi@lesley.edu

Attaching Files in the myLesley Text Editor

In this week’s exciting Agent L episode, we outwit Gremlins in the System’s (GITS) fiendish plot to prevent faculty from sharing important course files and resources.

Ben Friday: Agent L, we have an emergency!!! GITS has struck again. The Browse My Computer button has been removed from the Insert File window in the text editor. Faculty can’t upload attachments when creating their content. How are they supposed to share files with their students.

Agent L: Calm down, Ben. Show me what you’re talking about. I’m sure we can fix this.

Ben: (takes deep breath) OK. Go to the text editor anywhere in myLesley and click on the Insert File button.  

myLesley text editor

There should be three buttons including Browse My Computer which allows faculty and students to attach files from their personal computer, but now there’s only two.

browse computer button missing

Ben: How are faculty supposed to share their syllabus or study guide or readings or…

Agent L: Wait, Ben. Stop. Let’s take a closer look. What happens if we click on the Browse Course button? Hmmm… that appears to let us look through all the files already uploaded to the course. And look, there’s an Upload option.

browse course content

Ben: What does it do?

Agent L: I think it will let us upload and attach the files we want to share. I’m going to try it.upload files menu

Look I can click on Choose File and select the file I want to attach from my computer.

choose file

After l selecting my file, I click Submit to upload it to the course.  Then click Submit again to select it as the file I want to attach. Great, now I can edit the Name of the Link to File to something more reader friendly than the file name and add Alt Text for accessibility. Click Submit one more time.

edit file display info

Agent L: Voila! I’ve done it. There’s my file.

Ben: Amazing work, Agent L. That will teach  GITS not to mess with us.

Agent L: I live to outsmart GITS.

agent LLearn more about using the myLesley text editor at the Agent Support Site.  

Creating Links in myLesley

In today’s exciting episode, Agent L defeats Gremlins in the System’s (GITS) attempt to prevent faculty and students from creating links in myLesley.

ALvsGITS

Ben Friday: Agent L, we have an emergency! GITS is preventing faculty and students from creating links in myLesley!

Agent L: How? What’s happening?

Ben: Faculty and students are pasting links to other websites in the text editor, but they aren’t turning into links. They are just plain text… and some of the links don’t look very good either.

text editor with non-clickable link

Agent L: Hmmmm… I think I know how to fix this. myLesley’s text editor has a tool to create links. It’s called the Insert/Edit Link tool.

You simply select the text you want to be a link such as the pasted link, or if you want those long links to look nicer, type a few words to define the website you are linking to and select that text just as I’ve done below.

create a link

Then click on the Insert/Edit Link tool.

Paste your copied link into the LInk Path text box.

create link settings

For Agent Extra Credit, change the Target to Open in a New Window (_blank). Websites don’t always display well in the myLesley content frame. Opening them in a new window gives them the full browser window and all the options.

Finally click Insert. You can then finish writing your post or content in the text editor. Click Submit when you are done and you will have a nice looking clickable link. Simple.

final clickable link

BenBen: Wow, Agent L! Way to outsmart GITS!

Agent L: It’s my mission, Ben.


agent LLearn more about using the myLesley text editor at the Agent Support Site.

Taking Notes Across Your Devices

Started taking notes on your computer and now you’re sitting on the bus and want to review them? Standing in line to get your coffee and have a brilliant idea? Want to jot it down or add to already existing notes? Don’t have internet access, but need to jot something down? Tired of having to copy notes from your phone to your computer and back again.

Is the answer to all of those questions a loud YES!?!?!

evernote logo

Allow me to introduce you to Evernote.

What is Evernote?

Evernote is both a digital notebook and digital file cabinet. Take notes while in a meeting or draft documents just as you might in Microsoft Word. Create a to do list or checklist for a project or chore. Attach and annotate a PDF document. Use your microphone to record a quick audio note. Take a picture with your phone or upload an image from your computer. Clip a web page from the internet. Tag items with keywords and group them all together in a notebook to easily find later.

evernote layout

image from www.dadislearning.com/

Why is Evernote Awesome?

Evernote’s true power is in its ability to work across devices. Have access to all your notes regardless of where you are. Create a note on your computer using Evernote’s desktop application and then move to your iPad during your meeting. Jot down or audio record that quick brainstorm your phone while riding the bus home. Your notes will sync to your account and move with you to whatever device you are on.

Don’t have internet access, but need to take notes and don’t want to have to remember to copy them to Evernote later. No problem. Evernote will upload it to your account the next time you connect to the internet with that device. You can even share notes with colleagues.

Evernote lets you decide where you work and on what type of device: laptop or desktop computer, iOS or Android. There’s no special file formats or exporting to deal with. Just take notes and organize them. Simple.

How do I get started?

To get started with Evernote, go to https://evernote.com/ to create your account.

Then download the software for the devices you own:

Review video tutorials for Evernote to learn more at Lesley’s Atomic Learning portal. Sign in with your myLesley username and password when prompted.