Lync Web for Online Meetings

lync2013.png

Lync Web App is an instant messaging and audio/video chat tool. It’s a great option for online meetings, ad hoc conversations, advising and tutoring. Lync Web includes text-based instant messages, audio and video chat, the ability to share Powerpoint presentations or even your desktop to demo applications or processes. There’s also a whiteboard for quick collaboration and a polling tool for rapid feedback in larger groups.

It’s easy to get started with Lync Web. It runs entirely in your web browser and you only need to install a quick plugin to start your first session. Lync can be accessed using the same login and password as your Lesley email.

Having trouble finding time to meet with your colleagues? Why not schedule your meetings virtually? You can do this directly in Outlook or the Outlook Web App, just as you would any other type of meeting. Select the “Online Meeting” options and a link to the Lync meeting will be included in your invitation. Need to meet with someone who isn’t part of the Lesley community or want to invite a guest to your class discussion? No problem. Include their email address in the meeting invite and they will receive guest access to the online meeting. Note: Guests have slightly fewer privileges for presenting, but will be able to fully participate in the discussion and access the whiteboard.

Lync allows you to participate in online meetings in a variety of ways. There is a desktop client for both Windows and Mac and mobile clients for Windows, Android and iOS so you can even stay connected when you aren’t at your desk.

You can find more information on how to get started with Lync at support.lesley.edu.

Not sure if Lync is right for you and want to consider other options? Check out the Comparison of Online Meeting Tools for a quick overview.

Teaching Body Movement Online with Kaltura Video

Nancy Beardall teaches Body/Movement Observation and Assessment for the Expressive Therapies program. This September, she taught the course in a fully online format for the first time. Initially, Nancy couldn’t imagine how she could successfully support students learning body, effort, space, and shape at a distance. Enter Kaltura, a video recording and sharing software that is integrated directly into myLesley.

Nancy’s students were required to observe and practice the fundamentals of body movement, but they were only going to be on campus for a few weeks during their summer residency. Nancy’s solution was to record her on campus students performing the body fundamental exercises and then uploaded these videos to her online course using the Kaltura Media Gallery. The online students could then review the videos as often as they needed, comment on what they observed in their assignments and discussions, and then practice the movements on their own. If students had questions, Nancy could refer them to the videos and even reference specific moments or clips within the movies.

body fundamentals video screenshot

The Kaltura videos worked so well that Nancy’s on campus students wanted to use it as well. The videos provided them with an easy way to review and practice their observation skills outside of class. They also uploaded selected dance project videos to Kaltura to share with their classmates for feedback.

Nancy has nothing but good things to say about Kaltura. She refers to it now as a “lifesaver” for her online course. She and her students also found it much more accessible and less cumbersome than previous software tools they had used to share video. Considering that Nancy didn’t get access to Kaltura until three days before the start of her course, and needed to get both herself and her students comfortable with the tool, this is high praise for its ease of use.

So what are you waiting for? Contact eLIS and start using Kaltura Video in your online or face-to-face courses today.

myLesley Blogs, Journals & Wikis, Oh My!

Did you know that myLesley has its own built-in set of blogs, journals and wikis? They’ve been around for a while, but with the latest myLesley update now is a great time to take another look.

Blackboard blog

What’s so great about Blackboard blogs and wikis?

Faculty who have already switched over to these built-in tools have found them to be far easier to use and set up. This is especially true if you create individual blogs for your students. Now there’s no need to manually set up a separate blog for each student. Just create your blog, click a single button (Individual to All Students) and Blackboard will automatically take care of the rest. Note: If you select the Course option all of the students will post their entries to a shared single blog.

individual blog setting

Blackboard blogs, journals and wikis have the same text editor as the discussion board so your students do not need to learn a new tool. Adding images and media is far more straightforward and obvious and because theses tools are native to the Blackboard environment, they have access to all the Blackboard tools. This includes the ability to easily add and/or record video with Video Everywhere, recording audio with Voice Authoring and integration with the Grade Center.

What you need to know?

All Blackboard blogs, journals and wikis are private to your course and can only be accessed and viewed while you and your students are logged into myLesley. This set-up fully complies with FERPA regulations. This privacy feature also means that you cannot copy blog or wiki content to another course.

If you have created a template for a wiki assignment, we recommend that you set it up in another course, such as a development shell or your myspace (aka Faculty Demo Student Account). You can then manually copy and paste the pages of the wiki into your new course. You could also create a Word document with the structure of each page and save it with your other course resources. This may seem a little more cumbersome than simply copying the wiki from course to course, but it’s easier than having to delete all the pages and student comments from last semester’s wiki assignments in order to start with a clean template.

Where to find out more info?

Please review the support pages below for more info on how to set up the tools, create and edit content, and grade student work.

Blackboard Wikis
Blackboard Blogs and Journals

What to Look Forward to in Blackboard for Fall 2014

On August 26, 2014, myLesley will be upgraded to the latest version of Blackboard (Blackboard Learn 9.1 April 2014). This scheduled myLesley upgrade will resolve known issues and include several new features and enhancements that are especially useful for faculty. They include:

Student Preview – Quickly View Your Course as a Student
Toggling the new Student Preview button provides instructors with the capability to see and experience their myLesley courses exactly as their class does. While in Student Preview mode, instructors can perform the following student activities: submit assignments, take tests, create blog posts, create journal and wiki entries and view traditional student only tools, such as My Grades. For more information, review the Details or watch the Overview Video below.

SafeAssign
SafeAssign, the tool that reviews assignment submissions for plagiarism, is now integrated as an option right in the Assignments tool and also includes a suite of new reporting features. For more information, review these Details.

Atomic Learning
Atomic Learning is a free service available to all Lesley students and faculty. Atomic Learning features hundreds of self-paced video tutorials on popular software tools and online resources. You can now add these tutorials directly to your myLesley course for students to review without needing to login to a different site. See our Atomic Learning tutorial for more information.

Achievements Tool
The Achievements tool allows instructors to define criteria for issuing rewards to students in the form of both Badges and Certificates. Students can see which rewards they’ve earned and what’s required of them to receive additional rewards, providing insight into learning progression toward defined competencies. For more information, review the Details or watch the Overview Video below.

Anonymous Grading
Instructors can hide student names from submitted assignments for anonymous grading. Review the Details for more information.

Grade Center Tips & Tricks

The Grade Center is a great way to keep track of your grades and provide feedback to your students online, but it can seem cumbersome when you first start using it. Below are a few tricks for getting around more smoothly. You can gain access to your grade center by clicking on the link located in the class menu.

Screen Shot 2014-04-15 at 8.45.31 AM
Be Sure to View the Icon Legend

The Grade Center uses several icons to indicate the status of a student’s submitted work. To review the meanings of these items click the “Icon Legend” button located in the bottom right-hand corner of the main Grade Center view.

GC_Icons_New

How-To Organize and Re-Arrange Your Columns

When you create new grading columns, the Grade Center always places them at the end of your view. You can rearrange them based on due date or type of assignment to more easily find the grade column you’re looking for. This will also assist students in quickly locating their graded work in an orderly fashion.

To reorder your columns, click on Manage in the toolbar and then Column Organization.

manage menu

Your columns will be displayed in rows. Click on the small move icon at the beginning of the row and drag the row to your preferred location. Drag rows that you would like to be frozen above the gray row. These will remain fixed in place at the beginning of the Grade Center as you scroll through the columns. Note: Most faculty find having the student’s name frozen to be very helpful.

organize columns

Hide Columns You Don’t Need

You probably don’t need the Availability column or the Student ID column. They’re just taking up valuable visual real estate on your screen. Hide these from your view by clicking on the column menu and selecting Hide Column. Be aware that this does not hide the column from your students’ view in My Grades.

To hide a column from your students, select Show/Hide to Users from the column menu. The column title area will display a dark gray circle with a red bar  
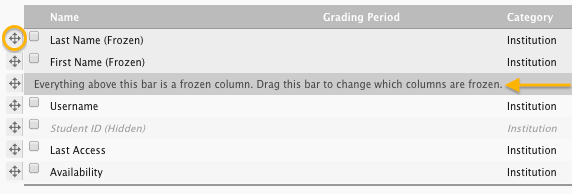
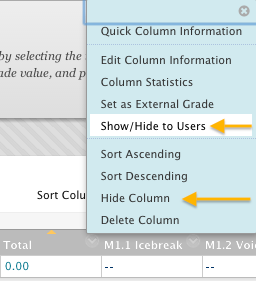
through it to indicate that it is hidden from the class.

show hide users

Use the Built-in Navigation Tools

Tired of clicking into an assignment and then back out to the main Grade Center and then into the next student’s assignment over and over again? Use the navigation options at the top of the Grade Details area. Click the forward and back arrows to go to another student or grade column.

navigating grade details

To access Grade Details, click on the menu icon in a grade cell and choose View Grade Details.

View grade details

Additional information about using and successfully navigating the Grade Center is available on our resources website.