Organizing a Week of Teaching

Link to a Word Document with a Module Template Creation Guide.

When you design your course, we recommend that your content be “chunked” into discrete, manageable units of learning. Whatever you decide to call it – a module, session, unit, or section, the most important thing to remember is to present materials to your students in a meaningful and helpful way. Treat it as a “learning guide” to help students make connections with what they are studying to their future endeavors by writing narrative pieces that include important and worthwhile instructions/ references.

One way to do this is to follow a weekly format that aims for each weeks’ layout to be similar, and predictable. A recommended format for a week is to provide the following:

Teaching Notes

This is a private section to leave notes for yourself (or other instructors) to guide you through facilitating the specific week. It can range from reminders to make a special announcement for an assignment that is outside a regularly scheduled deadline to a script with PPT slides to make a needed video or lecture presentation. While this section will not be seen by the students, we consider it important to include this section to help you keep track of facilitating notes and potential pitfalls to avoid.

Overview

The Overview section begins with a 1-2 short paragraph narrative, which provides the context or “glue” for the module’s content and learning activities. Speak directly to the students and include information that frames the content in your voice and with your perspective on the content. Include any critical information that may have been traditionally delivered orally in the face-to-face classroom. This might include illustrative stories or examples, challenges students may encounter with key concepts, typical misconceptions, an overview of the module’s activities, and so on.  If this section becomes too lengthy, you might also elect to include specific portions within the context of the rest of the module sections.

Weekly Learning Outcomes/Objectives

Unit-level objectives that describe what students should be able to do by the end of this specific week.

After completion of this week’s activities, you should be able to:

  • Identify….
  • Analyze…
  • Please refer to the Bloom’s taxonomy list for other learning verbs.

These weekly objectives should draw a clear connecting line to the overall course learning outcomes.

Required (& Recommended) Readings and Resources

Elaborate on the information provided in the Syllabus by explaining why, how, and in what order students should work through the resource materials. For example, if you include a YouTube video as a course resource, briefly explain your rationale for selecting that particular video, information students should pay close attention, etc.

Instructional Materials

This section can be excluded if all your instructional materials for the week is in the Readings and Resources section. If you want to call special attention to something specific, you can have it here as a separate section. In a typical synchronous delivery modality, your content may be given as an interactive lecture, balancing passive and active learning. HyFlex and Hybrid courses include both online and in-class delivery simultaneously, strategies for content delivery will necessarily incorporate various educational frameworks and technologies. One strategy is taking the Flipped Classroom approach. Do not simply repeat the information students already encountered in the readings and resources. Focus on:

  • Expanding their understanding by providing important background information
  • Clarifying important concepts by explaining them in a new way
  • Connecting new information to previously learned concepts
  • Providing real-life examples
  • Prompting students to connect content with their lived experiences

Learning Activities/Assignments

This section provides students with opportunities to interact with content, peers, and the instructor. Now that students have worked through the reference and instructional materials, what will they DO? Activities should be relevant, preparing students for success in their evaluated coursework and in their future professions. Activities may be completed by individuals, small groups, or the entire class. They may include personal reflection, class discussion, concept mapping, case study, simulation, educational games, interviews, as well as evaluated course components such as assignments and quizzes.

This section should be used for anything that is graded. The format for assignment activities you choose to implement in your course should be consistent so that students do not get confused. This consistency will allow students to focus on the content and activities rather than the format or the need to search for extra details.  For each learning activity/assignment, you will need to provide clear instruction for interactivity, submission, and criteria for assessment. This may be stated in your syllabus, but it is good practice to repeat details here.

See the following example for a discussion activity.

Activity Type (Discussion): (Include a descriptive name for activity)

Use the space to describe activity/assignment. This includes:

  • Context for assignment and how assignment relates to reading, other course activities, and/or objective(s).
  • Details about how to perform the assignment
  • Link or reference to assessment criteria or rubric
  • Information about where to submit and if and how to respond to classmates
  • When the assignment is due.

Include due dates. for example, for a discussion activity, you will want to provide:

  • Post your initial thoughts to the discussion board by day of week at Noon.
  • Respond to at least two of your peers by some other day later in the week at Noon.

Provide a rubric or assessment details:

  • This activity will be graded out X points, following this breakdown….

Repeat instruction set for as many activities/assignments you plan for the week.

Checklist for the Week

Provide a list summarizing the important due dates for the week. For example,

  • Post-initial thoughts to the discussion by Thursday
  • Post your field observation to the blog by Thursday
  • Post responses to at least two of your colleagues’ discussion posts by Sunday
  • Post comments on at least two of your classmates’ blog post by Sunday.

Link to a Word Document with a Module Template Creation Guide.

HyFlex Teaching Tips – Quick Technology Checklist

A few things to keep in mind when teaching using the HyFlex Media cart

Lesley Account and Login Credentials

Before everything else, you need to remember your Lesley username/password and have your multi-factor authentication device accessible.

HyFlex Cart

  • Whenever possible, reboot the HyFlex Media Cart in the classroom.
    • If the HyFlex Media Cart is already off when you enter your classroom, just turn it on and you should be good to go.
    • If the HyFlex Media Cart is on and logged in when you enter your classroom, please restart it following the directions (pdf).
  • When your class is over, please remember to shut down the HyFlex Media Cart before leaving.
  • You can move the cart, but it is limited to the tether attached to the cart.
    • Be careful to avoid rolling over any wires and cables.
    • The cart is heavy, please take care not to harm yourself or others.

Personal Computer/Laptop

  • If possible, reboot your personal computer/laptop before starting your teaching session.
    • There are many benefits of restarting your computer and sometimes, that is all it needs to take to fix many issues, for example, connectivity, memory, and other performance issues.
  • Connect to Lesley’s primary wireless network, Eduroam.
  • If you join the Zoom meeting from your personal computer, in addition to the HyFlex Cart, please remember to mute your microphone and silence your computer’s audio.

Online Meeting Space

  • Encourage everyone to test their microphone, web camera and speakers prior to or at the start of every virtual session.
    • If you’re able to, try to set up your classroom a few minutes early.
    • Remember to think about your background in the video. If you or your students are not in an environment that can be shared, try using a virtual background.
    • Remind your students to not sit directly in front, behind, or below a bright light source. Experiment with moving lamps and the camera until you can see your face brightly lit on screen. Covering a bright window or moving to another location may help.
  • Try to have your students attend your class meetings in a quiet, indoor location to control ambient noise.
    • If they’re unable to attend from a quiet location, ask them to mute microphone before joining the class meeting. You will be able to ask them to unmute when they need to speak.
    • If possible, have your students use a headset with headphones and a microphone for best quality audio.

Ways to Use “The Chat” in Person

As we transition back to traditional classrooms, we may find we’re missing the advantages the chat feature gave us while meeting virtually through an online meeting tool.

Adapting a few online chat activities, Chad Littlefield, Co-founder & Chief Experience Officer of We and Me, shares 3 Clever Ways To Use “The Chat” In Person” via YouTube.

His first way is to promote passing of notes. You will need to prepare a stack of note cards or a pad of paper. Strategically design pauses when teaching the content to have students write down a quick response to what has been said. Then pass those notes around with each other. Some advantages he mentions is that you make sure that everybody’s perspective is included, it is introvert-friendly, you exchange a lot of ideas quickly, and it is a fun, kinesthetic activity. (Tae-Jin’s bonus thought – you can collect and collate the notes for later use.)

Second Idea is to “popcorn” aha moments. Similar to the idea of passing notes, but instead of writing down and passing around responses, just quickly share out-loud to the whole group. The idea is to get lots of voices out quickly, ideally, within 2-3 minutes of sharing. (Tae-Jin’s bonus thought – do not be afraid of silence, and do not be discouraged if it doesn’t go as planned the first few times you try this type of activity. There is a learning curve for this type of response that everyone needs to overcome to become comfortable with speaking out.)

And finally, a twist on the Pair-Share activity. After doing the pair-share activity we’re familiar with, rather than sharing out what you said, have people share out what they heard someone else said. One advantage of this twist is that it promotes reflective listening and rewards your groups for listening.

Merging Your Content with the New Course Menu

A new course menu and template were created for this Fall. The purpose was to create more consistency for students across all their courses and to embed supports where possible. However, if you are copying content from a previous course in myLesley to your Fall 2020 course, you may need to merge the two and clean things up a bit.

What’s in a course menu?

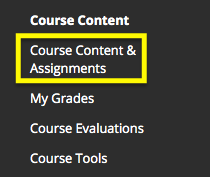
There are three main types of course menu items: content areas, tool links, and web links.

Course Content & Assignments is a content areaContent Areas are places in your course where you post various types of course content, such as items, uploaded documents, assignments, and more. Think of them as a folder on your computer where you group common items together. Course Content & Assignments is an example of a content area.


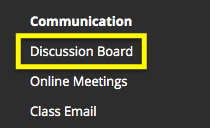
Tool Links are links to tools that are part of Blackboard or integrated into Blackboard, such as Discussions Boards, Class Email, My Grades, etc.


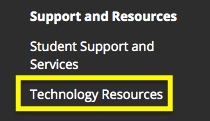
Technology Resources is a web linkWeb Links are links to external content. This external content can be anything on the internet that you wish to link to. For example, Technology Resources links out to the IT & eLearning Support Site at Lesley.


Course content and Communication are headers in course menuThe new course menu also contains Headers. These are non-clickable titles for groups of related content. They can be renamed, edited or moved just as any other menu item. “Course Content” and “Communication” are examples of a header.

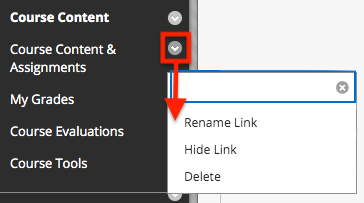
Your course menu is completely editable by you. Course menu items can be renamed, moved, deleted, and hidden from student view.

Modify menu

A Common Issue After Course Copy

If you copy your course content from a prior course you may notice that you have menu items for “Course Content” and for “Course Content & Assignments.” myLesley (Blackboard) will not merge these two content areas together automatically. Just as with folders you create on your computer, these are two separate containers with different names. You need to tell Blackboard what you want it to do.

Fix your course menu in 3 easy steps

1. Rename menu items

Many faculty choose to rename the older “Course Content” menu item to “Course Content & Assignments.”

For more information see Modifying your Course Menu.

2. Delete menu items

Delete the original (now duplicate) placeholder content.

Be very sure to delete. There is no undo.

Also, delete any duplicate or unneeded menu items that copied to clean up your course menu and make it easier for your students to navigate your course menu.

3. Reorder menu items

When a course copy is done, all new content copied in is at the bottom of the menu. You can easily reorder the menu items, but clicking on the double arrow icon to the left of the menu item and dragging it to a new location.
move icon


For more information see Modifying your Course Menu.

Tips for Reducing File Size

Do you have large document files that you are trying to send to colleagues or upload to an online site such as myLesley, VoiceThread, OneDrive, or SharePoint? In many cases, compressing your files, images, and videos will help to reduce your overall file size and meet size restrictions.

As a best practice, when uploading large files you will want to make sure that you are using a fast, stable Internet connection.

Documents (Microsoft Word)

You can reduce the file size of your document by compressing images. The compression options reduce both the file size and image dimensions based on how you intend to use the picture, such as viewing on screen or in an e-mail message. You can compress all images in the file or just the ones that you select.

For more information see:
Reduce Your File Size in Office for Mac
Reduce the File Size of a Picture in Microsoft Office (PC)

Presentations (Microsoft PowerPoint)

You can reduce the file size of your presentation by compressing images and media content. The compression options reduce both the file size and media dimensions based on how you intend to use the media.

For more information see:
Reduce Your File Size in Office for Mac
Reduce the File Size of a Picture in Microsoft Office (PC)
Compress Your Media Files

PDFs

You can reduce the file size in your PDF by compressing the entire PDF. This will reduce overall file size.

For more information see:
Optimizing PDFs in Acrobat Pro
Reduce the Size of Your PDF Online using Small PDF

Images

You can reduce the file size of your images by resizing. Please note that resizing an image will slightly reduce the image quality.

For more information see:
How to Resize a JPEG Using Paint in Windows
How to Resize a JPEG Using Preview in Mac OS X
How to Resize a JPEG Using an Image Resizing Website

Video

You can reduce the file size of your videos by saving in a different format, resizing, or compressing the file. Please note that this may slightly reduce the video quality.

For more information see:
How to Reduce Video Size Using Handbrake on PC
How to Reduce Video Size Using Handbrake on Mac
How to Reduce Video Size Using iMovie (Mac)