HyFlex Teaching Tips – Quick Technology Checklist

A few things to keep in mind when teaching using the HyFlex Media cart

Lesley Account and Login Credentials

Before everything else, you need to remember your Lesley username/password and have your multi-factor authentication device accessible.

HyFlex Cart

  • Whenever possible, reboot the HyFlex Media Cart in the classroom.
    • If the HyFlex Media Cart is already off when you enter your classroom, just turn it on and you should be good to go.
    • If the HyFlex Media Cart is on and logged in when you enter your classroom, please restart it following the directions (pdf).
  • When your class is over, please remember to shut down the HyFlex Media Cart before leaving.
  • You can move the cart, but it is limited to the tether attached to the cart.
    • Be careful to avoid rolling over any wires and cables.
    • The cart is heavy, please take care not to harm yourself or others.

Personal Computer/Laptop

  • If possible, reboot your personal computer/laptop before starting your teaching session.
    • There are many benefits of restarting your computer and sometimes, that is all it needs to take to fix many issues, for example, connectivity, memory, and other performance issues.
  • Connect to Lesley’s primary wireless network, Eduroam.
  • If you join the Zoom meeting from your personal computer, in addition to the HyFlex Cart, please remember to mute your microphone and silence your computer’s audio.

Online Meeting Space

  • Encourage everyone to test their microphone, web camera and speakers prior to or at the start of every virtual session.
    • If you’re able to, try to set up your classroom a few minutes early.
    • Remember to think about your background in the video. If you or your students are not in an environment that can be shared, try using a virtual background.
    • Remind your students to not sit directly in front, behind, or below a bright light source. Experiment with moving lamps and the camera until you can see your face brightly lit on screen. Covering a bright window or moving to another location may help.
  • Try to have your students attend your class meetings in a quiet, indoor location to control ambient noise.
    • If they’re unable to attend from a quiet location, ask them to mute microphone before joining the class meeting. You will be able to ask them to unmute when they need to speak.
    • If possible, have your students use a headset with headphones and a microphone for best quality audio.

Ways to Use “The Chat” in Person

As we transition back to traditional classrooms, we may find we’re missing the advantages the chat feature gave us while meeting virtually through an online meeting tool.

Adapting a few online chat activities, Chad Littlefield, Co-founder & Chief Experience Officer of We and Me, shares 3 Clever Ways To Use “The Chat” In Person” via YouTube.

His first way is to promote passing of notes. You will need to prepare a stack of note cards or a pad of paper. Strategically design pauses when teaching the content to have students write down a quick response to what has been said. Then pass those notes around with each other. Some advantages he mentions is that you make sure that everybody’s perspective is included, it is introvert-friendly, you exchange a lot of ideas quickly, and it is a fun, kinesthetic activity. (Tae-Jin’s bonus thought – you can collect and collate the notes for later use.)

Second Idea is to “popcorn” aha moments. Similar to the idea of passing notes, but instead of writing down and passing around responses, just quickly share out-loud to the whole group. The idea is to get lots of voices out quickly, ideally, within 2-3 minutes of sharing. (Tae-Jin’s bonus thought – do not be afraid of silence, and do not be discouraged if it doesn’t go as planned the first few times you try this type of activity. There is a learning curve for this type of response that everyone needs to overcome to become comfortable with speaking out.)

And finally, a twist on the Pair-Share activity. After doing the pair-share activity we’re familiar with, rather than sharing out what you said, have people share out what they heard someone else said. One advantage of this twist is that it promotes reflective listening and rewards your groups for listening.

What is the HyFlex Model?

“A Hybrid-Flexible (HyFlex) course design enables a flexible participation policy for students, whereby students may choose to attend face-to-face synchronous class sessions in-person (typically in a traditional classroom) or complete course learning activities online without physically attending class. Some HyFlex courses allow for further choice in the online delivery mode, allowing both synchronous and asynchronous participation.” (Beatty, 2019) 

Fundamental Values in Hybrid-Flexible Design 

  1. Learner Choice: Provide meaningful alternative participation modes and enable students to choose between participation modes daily, weekly, or topically. 
  2. Equivalency: Provide learning activities in all participation modes which lead to equivalent learning outcomes.
  3. Reusability: Utilize artifacts from learning activities in each participation mode as “learning objects’ for all students.
  4. Accessibility: Equip students with technology skills and equitable access to all participation modes.      

For more information on HyFlex course design, please refer to Brian Beatty’s ebook, Hybrid-Flexible Course Design. 

How does HyFlex differ from Hybrid Teaching? 

A hybrid course delivers instruction and learning activities both in-person and online, but not simultaneously. Hybrid courses should take advantage of the best features from both face-to-face and online learning, creating the “best of both worlds” within a single course.  

In a HyFlex course, instruction and learning activities occur together in-person and online, in real-time. “The HyFlex approach provides students autonomy, flexibility, and seamless engagement, no matter where, how, or when they engage in the course. Central to this model is the principle that the learning is equivalent, regardless of the mode.” (EduCAUSE). 


Piloting Blackboard Ultra

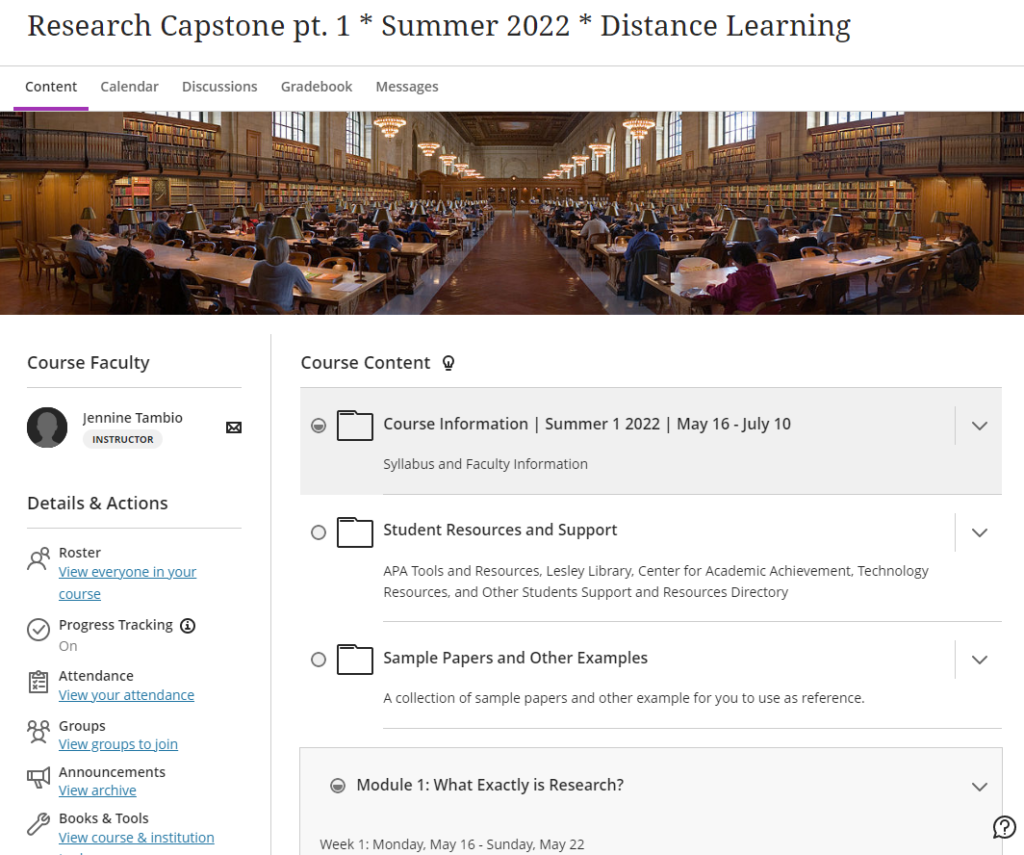
Jennine Tambio teaches the Research Capstone course for the College of Liberal Arts & Sciences (CLAS) at Lesley University. In this fully online course, students develop a senior research project based on an area of interest in their major. They synthesize the knowledge and experiences they have gained from prior courses through research, discussion, peer review, and reflection.

This summer, Jennine taught her SU1 and SU2 courses in Ultra Course View. Ultra is Blackboard’s newest version, redesigned from the ground up. It has several advantages including a more modern look, consistent navigation, progress tracking for students, streamlined grading, and more.

eLearning and Instruction Support (eLIS) at Lesley approached Jennine about piloting Ultra courses due to her heavy use of peer review. Previously, she had been using an external tool called PeerGrade which provided a robust framework for students reviewing each other’s work using rubrics. While Jennine liked PeerGrade, it required purchasing a subscription and the company was beginning to phase out its use in favor of a newer product. The Ultra Course View includes the option for peer review directly in its assignment tool. No additional tools required. Jennine also thought it looked cleaner and easier to use.

To get started, eLIS set up and transitioned the first few weeks of the course. Jennine quickly took over creating the subsequent weeks with guidance from eLIS. She had a couple of minor questions that were quickly answered while learning the new environment, but nothing significant. As part of the transition, she consulted with eLIS on how to reorganize parts of her course to make it concise and easier to navigate. She also worked to turn the narrated Powerpoints she had previously created into Kaltura videos making them more accessible for her students and captioned.

The resulting Ultra courses were very successful. Jennine got a lot of compliments from her students who “thought I had just made a beautiful Blackboard course.” Her students “were all able to hop in and seamlessly navigate” the course.

“It’s much cleaner, fosters more collaboration because of the format. The peer review feature was really cool and I loved that part of the course.”

“I enjoyed how easy it was to see what was due each week and to check them off!”

“I like Ultra Course mode much better.”

– Student survey responses

The process of transitioning her course helped her to “improve the quality and delivery of the course.” The peer review tools in Ultra were easy to use and allowed her to see each student’s submission, their feedback to others, and the self-review of their own paper all in one space. The students didn’t need to navigate to another site and learn another tool. And Jennine didn’t need to pay for a subscription.

According to Jennine, “It’s not a stressful transition.” While recreating her course took a little time, she appreciated the opportunity to rethink, update, and finetune certain aspects of her course. She found the final result more visually appealing. Her students were very engaged and she discovered helpful tools and nuances for a better teaching experience.

Interested in learning more about the Ultra Course View and if it is right for you? Contact elis@lelsey.edu.

A Frequently Made Support Request

The eLIS support channel often receives requests for Blackboard/MyLesley orientation. Here’s what I focus on in that first walk-through with a new instructor:

First, I talk them through creating a welcome message to their students using Announcements. It’s the first thing students will see when they come to a course site by default. It’s also a good opportunity to introduce the Content Editor and the functionality available there.

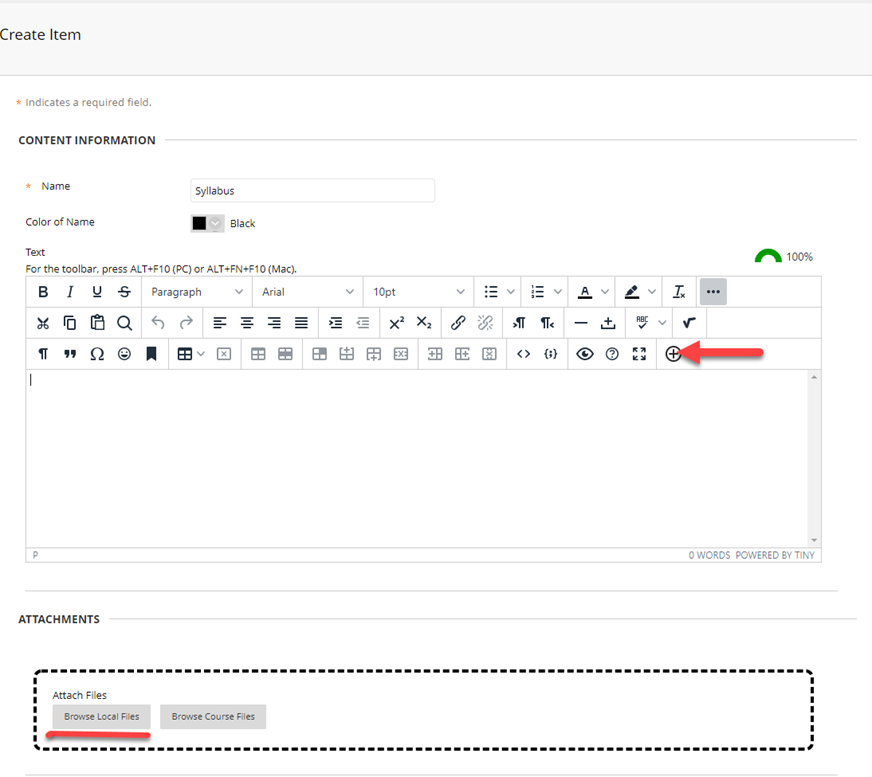
Second, I show them how to upload their syllabus into their course. This allows me to show a couple of different ways to attach a file to a content item, either via the attachment feature in the text editor or via the “attach file” tool below it.Blackboard Content Editor highlighting Plus tool

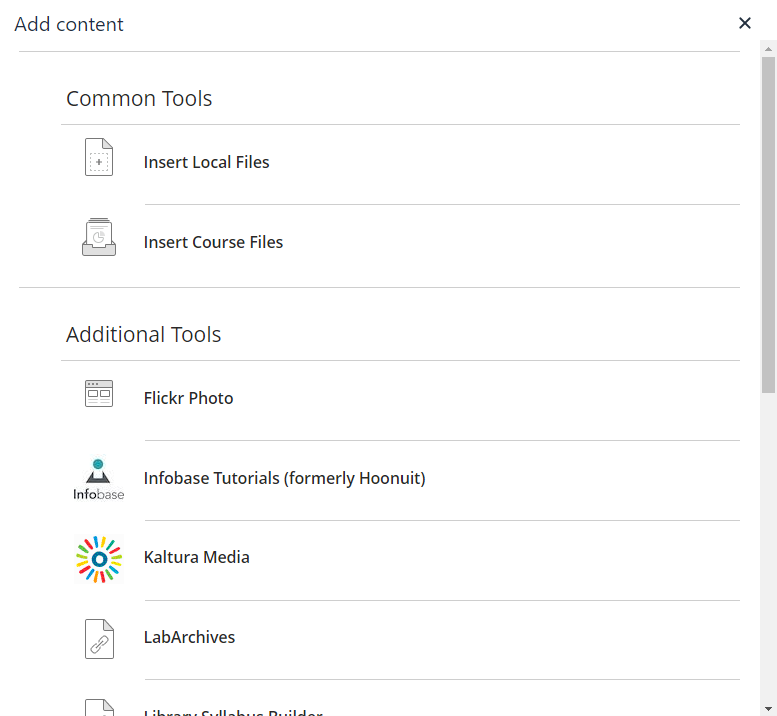
I point them to the circle-plus icon in the text editor, because of the added functionality there, such as Kaltura and Voice Thread. I don’t go into too much detail about either of those two items— it feels like too much information for a first walk-through, and one can always come back later for more info.

Add Content menu in Content Editor

The third area I touch upon is the Assignment tool, because it’s the perfect entrée into the Grade Center, which is the final thing I spend time on. The assignment tool creates a column in the grade center automatically. I can then show them how to create manual columns. New instructors often ask how their students can see their grades, which allows me to point to the My Grades tool, and therefore Student Preview, which allows instructors to see what’s in My Grades, among other things.

I wrap up by saying, “There’s a lot more to show you, and if you’d like we can make an appointment to go into more detail, or you can ask questions via email at elis@lesley.edu.”