Community Conversations: Using Class Time Strategically

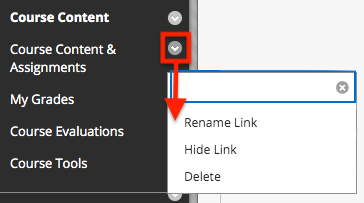
On Tuesday, January 19, 2021, we held the first in a series of monthly roundtable discussions called, Community Conversations. We’re planning to host these faculty-led discussions on various teaching and learning topics throughout the Spring 2021 semester.

The topic of our first conversation, “Using Class Time Strategically,” was led by Jo-Anne Hart, Sue Cusack, Susan Patterson, and Diana Direiter. We had over 60 faculty join us throughout the hour, sharing their remote teaching and learning experiences.

Reflecting on your Course Materials

Jo-Anne started the conversation by sharing some questions she uses to help identify course elements to balance and boost the effectiveness of meeting synchronously and asynchronously. She reminded us that there is no clear-cut answer for every situation – No One Size Fits All.

Some example questions included:

  1. At what points in my material are student interaction and community most important to successful student learning in my specific class?
  2. Where it my material can I start something offline, in discussion-type mode, and pick it up in live session? Or vice versa?
  3. Where in my material is it key for students to engage with each other?

Co-Building Community Norms

Sue reminded us that “unstated norms in a virtual classroom will evolve, for better or worse.” (Fisher, Frey & Hattie, 2021) Start your course’s sense of community by having everyone collaborate to build out stated norms. She shared a few questions from Fisher, Frey and Hattie to help set the stage:

  • What habits and dispositions are needed to be successful learners? ​
  • What should they learn about themselves as learners? ​
  • How should they interact with you and others to maintain learning conditions? ​
  • What should they do with their learning? ​

She then asked the group, “What guidelines or norms do you think are important?” Here are a few of the responses:

  • Listening to others​
  • Lean In/ Lean out idea​
  • Be present…Defining what it means to “be present”
  • Careful not to interrupt​
  • Using proper pronouns
  • Practice Active Listening
  • Set rules for positive, constructive feedback
  • Establish guidelines for respect for differing opinions
  • Quick feedback

Five Steps to Stay Focused

Susan shared a teaching strategy that is akin to working out with High Intensity Interval Training (HIIT): Five Steps to Stay Focused When Teaching Online: Try Balancing High Intensity Activity with Periods of Recovery, from Ringal, Tarallo, & Green (Harvard Business Publishing, May 13, 2020). When  you plan a class meeting, treat it like a HIIT workout. For example, “if you have an hour of class time, think of ways to break it up into intervals of presentation, participation, reflection, and individual silent work and study with the educator on hand to answer any questions that arise.”

Susan shared an example of how she breaks up her 90 minute civics course into intervals of activity: agenda and welcome (rest), check in (warm up), introduction to the project (moderate), brainstorming (intense), stretch break (rest), report out ideas (moderate), breakout groups for discussion (intense), short discussion and Q&A (moderate), and an exit ticket (cool down).

Example of Susan's 90-minute civics class, broken into intervals of rest, warm up and cool down activities, moderate activity, and intense activity.

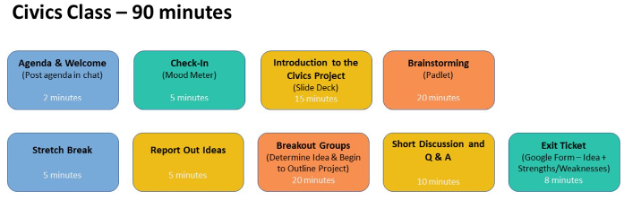
Example of Susan’s 90-minute civics class, broken into intervals of rest, warm up activity, moderate activity, intense activity, and a cool down activity.

Connecting Synchronous and Asynchronous Coursework

Diana shared some strategies for connecting synchronous and asynchronous coursework. Her key points were maintaining balance, connecting to the materials, and connecting to one another. She summed up these points with the three R’s from Katz and Jordon (2020):

Rhythm: Spread out the sync and async sessions.
Routine: Build consistency for the class, not the delivery.
Relationship: Communicate, communicate, communicate.

Community Discussion

The short presentations sparked a lot of interest from the participants and led to some great questions and discussion.

One participant asked Susan about the Mood Meter she mentioned as a way of quickly taking the current temperature of the class. Susan shared her favorite Mood Meter, but suggested doing a Google search to find one that would might work best for your class.

Another question that sparked a lot of interest was, “Is it better to record lectures ahead of time rather than deliver them live?” Opinions differed. Some faculty stated that their students preferred to have their lectures live on Zoom, while others stated that their students prefer them pre-recorded. But, as Jo-Anne mentioned at the beginning of the conversation, there is no one answer for every situation. It comes down to your learning outcomes and what will help your students reach them.

Stay Connected and Continue the Conversation

Our next conversation will take place on Tuesday, February 16 at 12:00 PM ET and will focus on Peer Review with Kimberly Lowe, Lisa Spitz, Summer Clark, and Bill Porter.

For more information, email elis@lesley.edu or join the Faculty Community Conversations Teams Channel. The Teams channel will feature all the presentation slides and a copy of the Zoom chat for each of the Community Conversations. You will be prompted to login with your Lesley University credentials to access the Teams channel.

Set Up Your Grade Center in myLesley

Setting up the myLesley Grade Center is not always the most intuitive thing. However, with a little bit of thought, it doesn’t have to be difficult.

Step 1: Create Your Plan

The first mistake most people make is they start in the Grade Center. Going into the Grade Center is usually the last step. If you try to set it up piecemeal, you will inevitably miss a step or forget what you entered somewhere and then before you know it, you’re lost.

The first step is to grab you syllabus, list out your assignments and grading scale, and make a plan. Watch the video below to see an example.


Step 2: Create Your Content & Assignments

The next step is to create my content in Blackboard, assuming I haven’t already done this. I’ve already created most of my content, but I still need to create the Final Project assignment. This video from Blackboard shows me exactly how to create an Assignment so my students can submit their work and I can grade and provide feedback.

Need to create graded discussions? Review how to create discussion forums on our support page.


Step 3: Create Grade Columns

Now that I have created all of my content and assignments, I can finally go to the Grade Center and finish setting things up.


Step 4: Calculated Grade Columns

Decisions, decisions… Total column or Weighted Total?

See our support article on Calculated Grade Columns for step-by-step instructions.


Step 5: Organize Your Grade Columns

All the grade columns are set up and ready to go, but Blackboard has them organized based on the order they were created. This might not be the ideal set up for you. So change it.

View Blackboard’s video tutorial on customizing your Grade Center view for more information.


Additional Resources

Your grade center is now set up and ready to go, but there’s always more to know and more scenarios for set up. Check out these resources below or email elis@lesley.edu for assistance.

myLesley Grade Center and Grading
Advanced myLesley Grade Center and Grading

Grading myLesley Assignments
myLesley Rubrics
myLesley Faculty Resources


Coming November 5th: New myLesley Text/Content Editor

On the evening of November 5th, Blackboard will release their new text/content editor! The new editor has been streamlined to make adding content into your course easier and the new design will work better on both mobile devices and larger screens. Blackboard has also improved their accessibility tools and introduced a few brand new features.

View the New Content Editor video for a sneak peak of the new content editor.

Better for All Devices

The editor is better suited for all devices—small screen or big—and editor tools will no longer open in new pop-up windows for a better mobile experience.

The toolbar will show as many tools as it can for the size of your screen before wrapping to the next line. Show and collapse the additional tools with the ellipsis icon.
ellipsis tool to show or hide more tools

Adding Content: The Power of Plus

Blackboard content editor with callout to Add Content buttonThere is now one easy menu for adding content from your computer or integrated tool. Click the Add Content button to upload content such as files or images or built-in tools such as Kaltura or Hoonuit (formerly found under Mashups).

Uploading multiple files? Instead of uploading them one at a time you can now upload multiple files at once.

Improved Accessibility

New Blackboard Accessibility Checker

The editor itself is more accessible to all users, and the new Accessibility Checker helps you make content more accessible as you’re adding it to your course. Combined with Blackboard Ally, you can ensure that your content is more accessible to all users.

Text Formatting, Bullets, List

Blackboard content editor with callout to formatting options

Options for formatting text, bullets, and lists are now presented in recognizable ways rather than just as text, more closely matching other editors, such as Google and Microsoft. For example, font choices will appear as those fonts and bullet options will display visually as those bullet types.

New Table Options

Blackboard content editor with callout to Table button and options

Creating a table has been simplified with a grid selector instead of a pop-up. When adding tables, column widths default to use percentages rather than fixed widths in order to ensure that they display nicely on different screen sizes.

Better Copy and Paste

Paste formatting options: choose to keep or remove formatting in the pasted content

Tired of wonky formatting when you copy and paste from Word, Google, etc.? Blackboard will now allow you to remove the extra HTML that gets in your way and still retain basic formatting.

Spellchecker Updates

New improved spellchecker suggests replacements for misspelled words

The Spellcheck tool has been improved for language and an updated and expanded dictionary. Click the tool to run spellcheck.

Simple Embed

Image of simple embed using the content editor

When pasting links to websites such as YouTube and Vimeo, the videos are automatically embedded for inline playback. Other sites including The New York Times, WordPress, SlideShare and Facebook will embed summary previews. However, you will still need to use HTML in order to embed VoiceThread content.

Easier HTML Editing

sample source code using HTML Editor

When authoring or editing HTML, it’ll be easier to find what you’re looking for with line numbers and tag colors.

Display Computer Code

Blackboard content editor with callout to Insert Code button

Authors can now share formatted computer code snippets. This is very useful for computer science classes.


Merging Your Content with the New Course Menu

A new course menu and template were created for this Fall. The purpose was to create more consistency for students across all their courses and to embed supports where possible. However, if you are copying content from a previous course in myLesley to your Fall 2020 course, you may need to merge the two and clean things up a bit.

What’s in a course menu?

There are three main types of course menu items: content areas, tool links, and web links.

Course Content & Assignments is a content areaContent Areas are places in your course where you post various types of course content, such as items, uploaded documents, assignments, and more. Think of them as a folder on your computer where you group common items together. Course Content & Assignments is an example of a content area.


Tool Links are links to tools that are part of Blackboard or integrated into Blackboard, such as Discussions Boards, Class Email, My Grades, etc.


Technology Resources is a web linkWeb Links are links to external content. This external content can be anything on the internet that you wish to link to. For example, Technology Resources links out to the IT & eLearning Support Site at Lesley.


Course content and Communication are headers in course menuThe new course menu also contains Headers. These are non-clickable titles for groups of related content. They can be renamed, edited or moved just as any other menu item. “Course Content” and “Communication” are examples of a header.

Your course menu is completely editable by you. Course menu items can be renamed, moved, deleted, and hidden from student view.

Modify menu

A Common Issue After Course Copy

If you copy your course content from a prior course you may notice that you have menu items for “Course Content” and for “Course Content & Assignments.” myLesley (Blackboard) will not merge these two content areas together automatically. Just as with folders you create on your computer, these are two separate containers with different names. You need to tell Blackboard what you want it to do.

Fix your course menu in 3 easy steps

1. Rename menu items

Many faculty choose to rename the older “Course Content” menu item to “Course Content & Assignments.”

For more information see Modifying your Course Menu.

2. Delete menu items

Delete the original (now duplicate) placeholder content.

Be very sure to delete. There is no undo.

Also, delete any duplicate or unneeded menu items that copied to clean up your course menu and make it easier for your students to navigate your course menu.

3. Reorder menu items

When a course copy is done, all new content copied in is at the bottom of the menu. You can easily reorder the menu items, but clicking on the double arrow icon to the left of the menu item and dragging it to a new location.
move icon


For more information see Modifying your Course Menu.