Check For, and Fix! Broken Links in Your Course

What can you do to prevent students clicking on links for required readings in your course and discovering that materials they are responsible for are missing? Links in new courses break for various reasons. It could be that the course copy process itself has somehow broken some links, though this is rare. It’s more common (and understandable) that pages linked to in your course have either been taken down or simply changed location on a revised site.

It’s good practice to proactively go through your course right after it’s been copied over and click on each link to make sure that they all work. Even if your course has a lot of links, the simple act of clicking on all of the links should not take too long. The part of the process that may take longer, depending on what you find, is fixing each link that doesn’t lead where it’s intended to.

The next step is to find the addresses for the materials you want to use when you rebuild the links. Start with searching the site for the information you’re looking for; most ed sites will have a search function. If you find that the information you want to pass along is either revised enough to no longer be useful or missing from the site altogether, you may need to find an alternative if the information is vital for your students. (Hint: you might use Lesley’s Ask a Librarian service for assistance with this.)

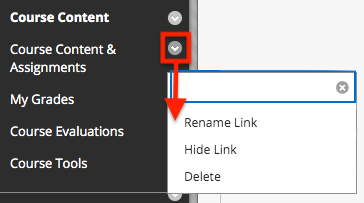
Once you have the new link in hand, saved to a word document or opened in a separate tab in your browser, you’ll need to build a new link, and then delete the old one. I recommend deleting the old link after building the new one, because it’s easier to see where the new link should go and should make it easier to identify and make any revisions in the language in your text in order to accommodate the change.

Here’s how to create the new link using Blackboard’s text editor, adapted for this post from our knowledge base article at support.lesley.edu:

Adding Links

When pasting links to websites such as YouTube and Vimeo, the videos are automatically embedded for inline playback. Simply paste the link in the content editor and Blackboard will automatically embed the video.image of the Blackboard content editor with an image added.

Other links, such as those to other websites, may display a preview of that page.image of the Blackboard content editor with preview of a linked page.

To ensure the links you create are accessible, your language should convey clear and accurate information about the link’s destination. For example, instead of adding a link to the text “Click here”, include the full title of the destination page, such as “Microsoft Office Support Resources.”

To create a link, click on the Insert/Edit Link button in the content editor (it’s the one in the second row that looks like two links in a chain.) You will be prompted to enter the URL (you may copy and paste the link from your browser or the word document mentioned above), the text to display (the descriptive word or phrase you want to use as your link), and select “Open link in… New window.”image of the Blackboard insert/edit link window.This last bit is important; Blackboard/MyLesley works better if you set the link to open in a new window. Clicking a link that is not created in this way will send you to an intermediate page warning you that you are about to leave your course site, which can be confusing. Using a new window will also help your students navigate back and forth between the content you are linking to and the course itself with a single click on a browser tab.

For more information about other aspects of working with the new text editor, view Using the myLesley Text/Content Editor on our support site.


Set Up Your Grade Center in myLesley

Setting up the myLesley Grade Center is not always the most intuitive thing. However, with a little bit of thought, it doesn’t have to be difficult.

Step 1: Create Your Plan

The first mistake most people make is they start in the Grade Center. Going into the Grade Center is usually the last step. If you try to set it up piecemeal, you will inevitably miss a step or forget what you entered somewhere and then before you know it, you’re lost.

The first step is to grab you syllabus, list out your assignments and grading scale, and make a plan. Watch the video below to see an example.


Step 2: Create Your Content & Assignments

The next step is to create my content in Blackboard, assuming I haven’t already done this. I’ve already created most of my content, but I still need to create the Final Project assignment. This video from Blackboard shows me exactly how to create an Assignment so my students can submit their work and I can grade and provide feedback.

Need to create graded discussions? Review how to create discussion forums on our support page.


Step 3: Create Grade Columns

Now that I have created all of my content and assignments, I can finally go to the Grade Center and finish setting things up.


Step 4: Calculated Grade Columns

Decisions, decisions… Total column or Weighted Total?

See our support article on Calculated Grade Columns for step-by-step instructions.


Step 5: Organize Your Grade Columns

All the grade columns are set up and ready to go, but Blackboard has them organized based on the order they were created. This might not be the ideal set up for you. So change it.

View Blackboard’s video tutorial on customizing your Grade Center view for more information.


Additional Resources

Your grade center is now set up and ready to go, but there’s always more to know and more scenarios for set up. Check out these resources below or email elis@lesley.edu for assistance.

myLesley Grade Center and Grading
Advanced myLesley Grade Center and Grading

Grading myLesley Assignments
myLesley Rubrics
myLesley Faculty Resources


Merging Your Content with the New Course Menu

A new course menu and template were created for this Fall. The purpose was to create more consistency for students across all their courses and to embed supports where possible. However, if you are copying content from a previous course in myLesley to your Fall 2020 course, you may need to merge the two and clean things up a bit.

What’s in a course menu?

There are three main types of course menu items: content areas, tool links, and web links.

Course Content & Assignments is a content areaContent Areas are places in your course where you post various types of course content, such as items, uploaded documents, assignments, and more. Think of them as a folder on your computer where you group common items together. Course Content & Assignments is an example of a content area.


Tool Links are links to tools that are part of Blackboard or integrated into Blackboard, such as Discussions Boards, Class Email, My Grades, etc.


Technology Resources is a web linkWeb Links are links to external content. This external content can be anything on the internet that you wish to link to. For example, Technology Resources links out to the IT & eLearning Support Site at Lesley.


Course content and Communication are headers in course menuThe new course menu also contains Headers. These are non-clickable titles for groups of related content. They can be renamed, edited or moved just as any other menu item. “Course Content” and “Communication” are examples of a header.

Your course menu is completely editable by you. Course menu items can be renamed, moved, deleted, and hidden from student view.

Modify menu

A Common Issue After Course Copy

If you copy your course content from a prior course you may notice that you have menu items for “Course Content” and for “Course Content & Assignments.” myLesley (Blackboard) will not merge these two content areas together automatically. Just as with folders you create on your computer, these are two separate containers with different names. You need to tell Blackboard what you want it to do.

Fix your course menu in 3 easy steps

1. Rename menu items

Many faculty choose to rename the older “Course Content” menu item to “Course Content & Assignments.”

For more information see Modifying your Course Menu.

2. Delete menu items

Delete the original (now duplicate) placeholder content.

Be very sure to delete. There is no undo.

Also, delete any duplicate or unneeded menu items that copied to clean up your course menu and make it easier for your students to navigate your course menu.

3. Reorder menu items

When a course copy is done, all new content copied in is at the bottom of the menu. You can easily reorder the menu items, but clicking on the double arrow icon to the left of the menu item and dragging it to a new location.
move icon


For more information see Modifying your Course Menu.

Introducing Bb Annotate!

Later this month we will be upgrading myLesley’s inline grading tool from New Box View to the new and improved Bb Annotate! Bb Annotate will allow you to provide inline grading and feedback to your students’ assignment submissions.

When is the upgrade?

Bb Annotate will be rolling out on Monday, May 25th. There is no expected downtime – myLesley will be up and running the whole time.

What is Bb Annotate? How is this different from the current inline grading tool?

Bb Annotate is more robust than the current inline grading tool, New Box View. Bb Annotate contains many more features, including a sidebar panel, annotation tools (including a highlighter, freehand drawing tools, eraser, image or stamp, text box, shapes, and more) and commenting tools.

For an overview of the available features, watch the Bb Annotate Overview Video.

How will this be different for my students?

Students won’t notice much of a difference. Like the current tool, once you have graded your students’ assignments, they will be able to view, download, and print their annotated files but are not able to add annotations to their submissions. For the best experience, students will need to open their annotated PDFs in a native PDF viewer, such as Adobe Acrobat Reader in order to view annotations.

Which file types are supported?

Like the current inline grading tool, Bb Annotate supports the following file types:

  • Microsoft® Word (DOC, DOCX)
  • Microsoft® PowerPoint®(PPT, PPTX)
  • Microsoft® Excel®(XLS, XLSM, XLSX)
  • OpenOffice® Documents (ODS, ODT, ODP)
  • Digital Images (JPEG, JPG, PNG, TIF, TIFF, TGA, BMP)
  • Medical Images (DICOM, DICM, DCM)
  • PDF
  • PSD
  • RTF
  • TXT
  • WPD

What happens to my students’ old assignments? Do I need to do anything?

You do not need to do anything on your end. All content will be migrated over to Bb Annotate during the upgrade. Your students’ old assignments will be imported over and all of your previous annotations will remain intact.

Does this affect the whole Grade Center?

No. Bb Annotate is only available for student submissions via the Assignments tool. Your Grade Center will not be affected by the upgrade.

How do I learn more?

Online Training

Blackboard is offering free online trainings on May 12th and 14th as part of their ongoing webinar series. Find out more or register for a training: Blackboard Instructor Webinar Training Series.

Documentation