Track Student Performance for Early Outreach

Once upon a time, Blackboard had an Early Warning System to alert you about students who might need outreach or additional assistance. It was a good idea, but it was clunky, awkward to navigate and hidden away. Therefore, no one used it.

The Early Warning System has now grown up and evolved into the much easier to use Retention Center.
retention center alert

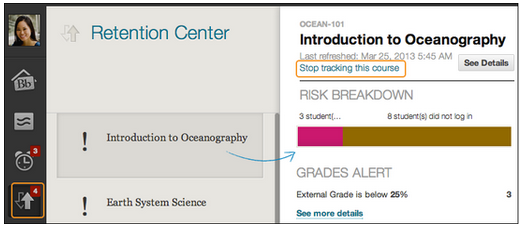
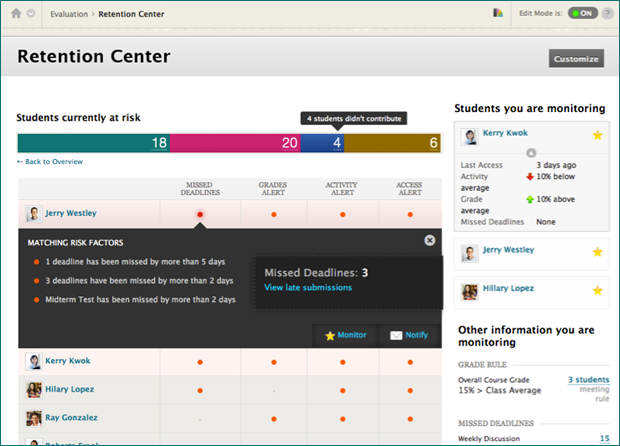
The Retention Center allows you get an at-a-glance view of how your students are doing. Alerts tell you if students haven’t logged in to the course recently, aren’t participating in course activities, have missed due dates or have grades below a certain threshold. You can easily navigate through multiple courses to get an overview or click for more details on a specific course.

You can choose to monitor at-risk students and contact them directly from the Retention Center. The Retention Center will keep track of your notification emails and any private notes about the student such as special accommodations for disabilities, additional assistance provided or extenuating circumstances. You can also set up custom alerts or edit the existing default alerts for a course. Only instructors and teaching assistants can see Retention Center information in myLesley.

Retention Center main page

Start using the Retention Center now! There is no setup required.

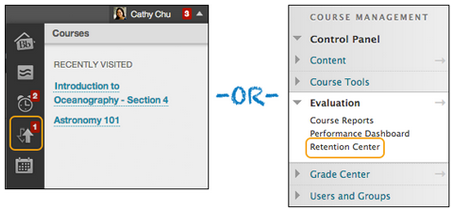
You can access the Retention Center in two ways: the My Blackboard menu in the top right corner of your window or from the Evaluation area of your course’s Control Panel.

Screen Shot 2015-10-06 at 3.16.45 PM

To learn more about how to use the Retention Center and its robust features, check out the Using the Retention Center tutorial.


Grade Center Tips & Tricks

The Grade Center is a great way to keep track of your grades and provide feedback to your students online, but it can seem cumbersome when you first start using it. Below are a few tricks for getting around more smoothly. You can gain access to your grade center by clicking on the link located in the class menu.

Screen Shot 2014-04-15 at 8.45.31 AM
Be Sure to View the Icon Legend

The Grade Center uses several icons to indicate the status of a student’s submitted work. To review the meanings of these items click the “Icon Legend” button located in the bottom right-hand corner of the main Grade Center view.

GC_Icons_New

How-To Organize and Re-Arrange Your Columns

When you create new grading columns, the Grade Center always places them at the end of your view. You can rearrange them based on due date or type of assignment to more easily find the grade column you’re looking for. This will also assist students in quickly locating their graded work in an orderly fashion.

To reorder your columns, click on Manage in the toolbar and then Column Organization.

manage menu

Your columns will be displayed in rows. Click on the small move icon at the beginning of the row and drag the row to your preferred location. Drag rows that you would like to be frozen above the gray row. These will remain fixed in place at the beginning of the Grade Center as you scroll through the columns. Note: Most faculty find having the student’s name frozen to be very helpful.

organize columns

Hide Columns You Don’t Need

You probably don’t need the Availability column or the Student ID column. They’re just taking up valuable visual real estate on your screen. Hide these from your view by clicking on the column menu and selecting Hide Column. Be aware that this does not hide the column from your students’ view in My Grades.

To hide a column from your students, select Show/Hide to Users from the column menu. The column title area will display a dark gray circle with a red bar  
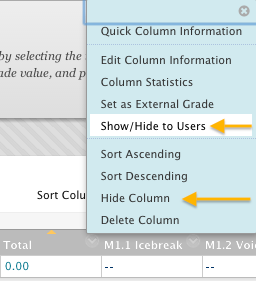
through it to indicate that it is hidden from the class.

show hide users

Use the Built-in Navigation Tools

Tired of clicking into an assignment and then back out to the main Grade Center and then into the next student’s assignment over and over again? Use the navigation options at the top of the Grade Details area. Click the forward and back arrows to go to another student or grade column.

navigating grade details

To access Grade Details, click on the menu icon in a grade cell and choose View Grade Details.

View grade details

Additional information about using and successfully navigating the Grade Center is available on our resources website.

Getting Familiar with Inline Grading

Did you know that myLesley has a new way to grade assignments? It’s called inline grading. Inline grading greatly streamlines the old grading process and best of all – it saves you time!

What is Inline Grading?

Inline grading allows instructors to view and grade submitted assignments directly in myLesley. You no longer need to download your students’ assignments to your computer to assess their work. Now you can view, annotate, and grade student work directly in your myLesley course.

inline_grading_grade_assignment_page

How Does it Work?

When you access a student’s submission in the Grade Center, myLesley will automatically load a preview of the submitted document. Simply click on the Comment button to open the annotation tools and interface.

annotation sample

Within the new grading interface you can create notes on specific areas of the document by highlighting sections of text and using the Comment button. The pencil tool can be used to draw in a freeform manner on the document as you might with a paper and pen offline.

Click on the Assignment Details link in the right-hand sidebar to reference the assignment requirements. If you use the Rubric tool, you can access and use your rubric from the Attempt section.

AsgDetails2
If you wish to provide additional suggestions or notes outside of the submitted document, type your message to the student in the Grader Feedback area.

GraderFeedback

Once you have finished grading your student’s submission, you have the option of downloading a PDF version (with all your newly created annotations) which you can save for your records.

Inline grading works with PDF’s, Word documents, Powerpoints and Excel files. If a student submits a different type of file such as an image file, you will be prompted to download the file to your computer exactly as you have done in the past.

What Does This Mean For My Students?

Students can also view their annotated and graded assignment directly in myLesley. Their view is very similar to the instructor’s interface. Students can also view any additional feedback you may have provided and download the annotated PDF with all of your comments to save for their records.

Please note that there are no changes to the way students submit their assignments. Also, as before, they can view and retrieve their graded assignments in one of two ways: by going back to the original assignment location or by accessing the MyGrades area.

How Can I Learn More?

For more information on how to use inline grading in myLesley, check out this overview or view the video tutorial.