Apply to the 2023 Summer Academic Technology Institute

This year’s Summer Academic Technology Institute will focus on transitioning your course to Blackboard Ultra Course View.

Blackboard Ultra is the latest version of Blackboard. It has been completely redesigned with a more modern and easier to navigate interface, improved accessibility, mobile responsiveness, progress tracking, and streamlined grading. The Summer Institute is a great opportunity to learn more and transition your course to Ultra Course View with the support of the eLearning & Instructional Support team.

Overview

There are two opportunities to participate in this year’s Summer Institute with one small cohort in each.

  • July 17-21 and 24-28
  • August 14-18 and 21-25

Each cohort will participate in a 2-week hybrid seminar. You will learn how to use Ultra Course View to create an engaging and user-friendly experience for your students. By the end of the 2 weeks, you should have your course well on its way to being converted to run in Ultra.

Please note there will be 1-2 synchronous seminar meetings each week, plus individual consultations with the eLIS staff.

Space is limited so sign up soon. All faculty – core and adjunct – may apply. Your course may be in any format/modality (online, on-campus, hybrid, hyflex, synchronous, asynchronous, etc.) Priority will be given to faculty using myLesley significantly to teach their courses.

Faculty Expectations

Faculty are expected to:

  • Attend and complete the Summer Institute course.
  • Develop or make significant progress toward developing their course in the Ultra Course View.
  • Teach a course in Ultra Course View during the 2023-2024 academic year.
  • Share and explain their experiences in Ultra with colleagues, focusing on the advantages of Ultra Course View.

Faculty who successfully convert and teach their course in Ultra will be awarded a $300 stipend and a printable certificate of completion.

Application

Applications are due by Sunday, May 7, 2023.

Apply Now – Login using your Lesley credentials to access the application form.

Email elis@lesley.edu with any questions.

What is the HyFlex Model?

“A Hybrid-Flexible (HyFlex) course design enables a flexible participation policy for students, whereby students may choose to attend face-to-face synchronous class sessions in-person (typically in a traditional classroom) or complete course learning activities online without physically attending class. Some HyFlex courses allow for further choice in the online delivery mode, allowing both synchronous and asynchronous participation.” (Beatty, 2019) 

Fundamental Values in Hybrid-Flexible Design 

  1. Learner Choice: Provide meaningful alternative participation modes and enable students to choose between participation modes daily, weekly, or topically. 
  2. Equivalency: Provide learning activities in all participation modes which lead to equivalent learning outcomes.
  3. Reusability: Utilize artifacts from learning activities in each participation mode as “learning objects’ for all students.
  4. Accessibility: Equip students with technology skills and equitable access to all participation modes.      

For more information on HyFlex course design, please refer to Brian Beatty’s ebook, Hybrid-Flexible Course Design. 

How does HyFlex differ from Hybrid Teaching? 

A hybrid course delivers instruction and learning activities both in-person and online, but not simultaneously. Hybrid courses should take advantage of the best features from both face-to-face and online learning, creating the “best of both worlds” within a single course.  

In a HyFlex course, instruction and learning activities occur together in-person and online, in real-time. “The HyFlex approach provides students autonomy, flexibility, and seamless engagement, no matter where, how, or when they engage in the course. Central to this model is the principle that the learning is equivalent, regardless of the mode.” (EduCAUSE). 


A Frequently Made Support Request

The eLIS support channel often receives requests for Blackboard/MyLesley orientation. Here’s what I focus on in that first walk-through with a new instructor:

First, I talk them through creating a welcome message to their students using Announcements. It’s the first thing students will see when they come to a course site by default. It’s also a good opportunity to introduce the Content Editor and the functionality available there.

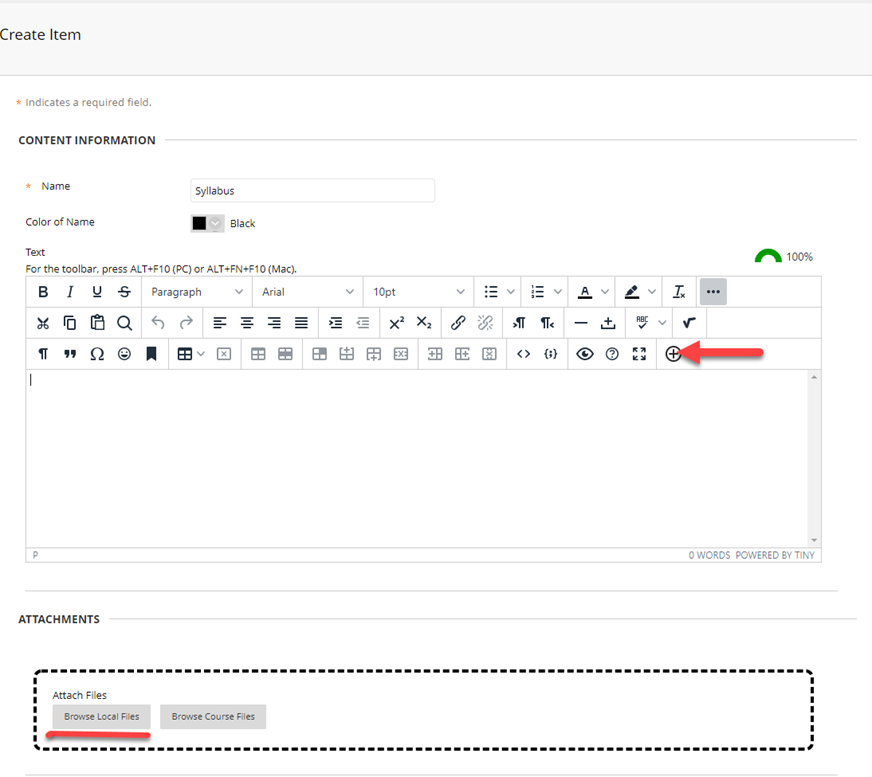
Second, I show them how to upload their syllabus into their course. This allows me to show a couple of different ways to attach a file to a content item, either via the attachment feature in the text editor or via the “attach file” tool below it.Blackboard Content Editor highlighting Plus tool

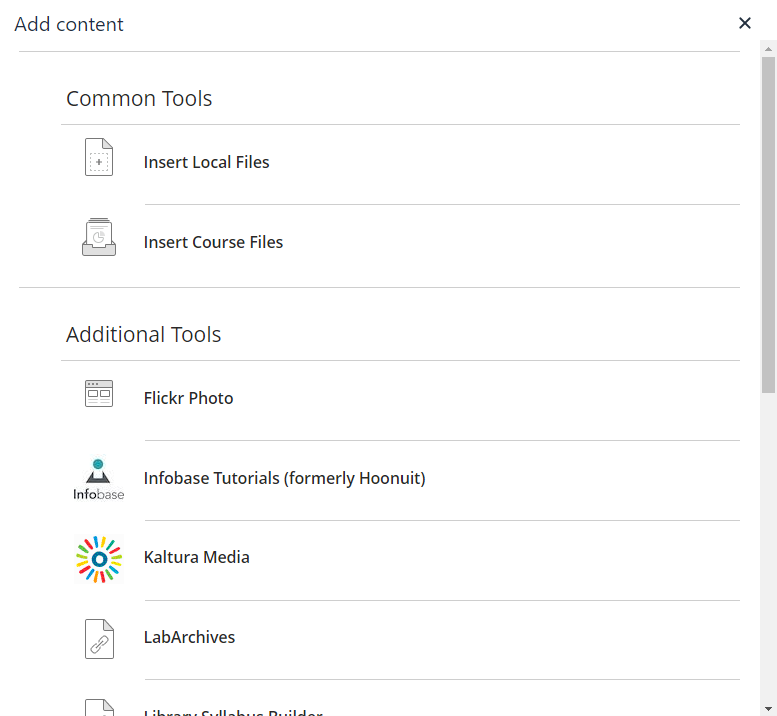
I point them to the circle-plus icon in the text editor, because of the added functionality there, such as Kaltura and Voice Thread. I don’t go into too much detail about either of those two items— it feels like too much information for a first walk-through, and one can always come back later for more info.

Add Content menu in Content Editor

The third area I touch upon is the Assignment tool, because it’s the perfect entrée into the Grade Center, which is the final thing I spend time on. The assignment tool creates a column in the grade center automatically. I can then show them how to create manual columns. New instructors often ask how their students can see their grades, which allows me to point to the My Grades tool, and therefore Student Preview, which allows instructors to see what’s in My Grades, among other things.

I wrap up by saying, “There’s a lot more to show you, and if you’d like we can make an appointment to go into more detail, or you can ask questions via email at elis@lesley.edu.”


Which Tool is Best?

One question we in eLIS are often asked is which tool is best for a particular assignment, or the obverse; what sort of assignment would a particular collaborative tool work best for? The answer, which I always imagine frustrates instructors looking for clear, unambiguous information to apply to their teaching practices is, “It depends.” We also make the point that it’s important to start from your learning objective and go from there. The tool should always be in service to what you’re trying to accomplish.

Once you have your objective defined, there are a number of considerations that can go into choosing which tool to use for, say, asking students to reflect on a reading, getting formative feedback to help determine what to emphasize in an upcoming unit, or encouraging your students to interact to inspire collaborative learning. Should you use the assignment tool or a journal? The discussion board or a blog? A wiki or VoiceThread? There may be instances where one or the other of these tools is the clear best choice, it’s true.

However, one of your main considerations should be what’s convenient and familiar to you and your students: what tool you know well enough that you can create an exercise that will bring the material or concepts you’re working with to life for learners. There’s no one tool that’s going to be the best in all instances, but if you have a go-to tool, you can almost always figure out a way to make it work for the task at hand.

In my parents’ home, the go-to tool for around-the-house, quick-fix situations was a butter knife. We used them to drive screws, scrape gunk off of pots and pans, pry up nails or push-pins, remove staples, open envelopes, scrape off excess putty or glue from quick repairs, spread butter on bread or baked potatoes, cream cheese on bagels, icing on cake, pull up burning toast out of the toaster, or in any number of other scenarios.

It may surprise you to learn that my dad was an auto body repairman, and there was always an extensive collection of tools out in the garage at our house, one of which could do almost any particular (non-food-related) job a little bit more efficiently. But a butter knife was handy, right there in the kitchen, and frankly, it did most of the jobs it was apt to be used for nearly as well as the thing you would have to go out to the garage on a cold night and rummage around to find.

Arguably the most versatile tool in Blackboard/MyLesley’s suite of tools is the discussion board. While there’s no justifiably convenient way to make it function as a private journal, for example, it does have capabilities well beyond its named purpose. It can be used as a makeshift blog or as a place to host visual student work, which is the way we most often see the wiki tool used. We’ve also seen it used as a place for students to post assignments.

The discussion board can be made gradable. Using the viewing setting “Participants must create a thread in order to view other threads in this forum,” it’s easy to make sure that students don’t see each other’s work before they submit their own. Once they do, they can automatically view the work of their peers. With the default settings of MyLesley forums, students are not able to edit their own work once it’s been submitted, although you can change that setting if you wish.

While the discussion board may be the most versatile tool in MyLesley — the true “butter knife” in your course site — it’s certainly true that virtually any of the tools available in your course site can be used in unexpected ways. It only requires your creativity and resourcefulness to find those new, unconventional repurposings.

How have you used MyLesley’s suite of tools in novel ways? We’d love to hear about it.

eLIS Workshops and Office Hours

Join eLearning & Instructional Support for a series of workshops and drop in office hours to help support faculty transitioning to online learning. All workshops are taking place online in Collaborate Ultra. There is no need to sign up in advance to attend.

Workshops

Creating a Basic Course Structure in myLesley/Blackboard 
Tuesday, March 24, 12-1PM  
Learn to create a very simple course structure in myLesley/Blackboard using a Weekly agenda, Weekly folders and Announcements.  

To join, please go to https://tinyurl.com/ElisOfficeHours

Discussions: Synchronous, Asynchronousand Blended 
Wednesday, March 25 12-1PM 
We’ll discuss the benefits of synchronous, asynchronous and blended discussions (use of both synchronous and asynchronous). We will consider “discussions” in the broadest sense of the word, including a variety of discourse-based interactions.  

To join, please go to https://tinyurl.com/ElisOfficeHours

Student Presentations and Feedback/Critique
Thursday, March 26, 12-1PM 
We’ll discuss methods and tools for presenting student work and providing feedback or critique on that work.  

To join, please go to https://tinyurl.com/ElisOfficeHours

eLIS Online Office Hours

Unable to attend one of our workshops but want to learn more? Just have a few random questions? Not sure what your question is? Join us for online office hours using Collaborate Ultra.

To join, please go to https://tinyurl.com/ElisOfficeHours

Monday, March 23, 10AM – 12PM 
Monday, March 23, 1PM – 3PM
Tuesday, March 24, 1PM – 3PM 
Tuesday, March 24, 6PM – 8PM   
Wednesday, March 25, 1PM – 3PM  
Wednesday, March 25, 6PM – 8PM 
Thursday, March 26, 1PM – 3PM 
Friday, March 27, 10AM-12PM